Showing posts with label FOOD. Show all posts

Friday, 27 November 2015

ANZAC BISCUITS

Today I was baking up a storm in the kitchen and doing a bit of house tidying when I thought, it has been a long time since my last post and I should share with you all how to make Anzac biscuits.
So that is what I am going to do.


Equipment/ Ingredients:


  • 1 & 1/4 cup of oats
  • 1 & 1/4 cup of Plain Flour
  • 1 & 1/4 cup of Sugar
  • 1 cup of Shredded Coconut
  • 150g of Batter
  • 1 & 1/4 table spoons of Golden Syrup
  • 1 teaspoon of Bicarbonate Soda
  • 2 Table Spoons of Boiling Water
  • Large Spoon'
  • Large Bowl
  • Small Saucepan 
  • Measuring cups ad spoons
  • Kettle

Method:


  1. Put on some of you favourite music
  2. Wash your hands.
  3. Collect equipment and ingredients
  4. Pre heat oven to 140 degrees celsius.
  5. Combine oats, flour sugar and coconut in a large bowl.


6. boil some water in a kettle.
7.Combine butter and golden syrup in a saucepan on low heat until butter is melted.


 8. Mix water and bicarb together then stir into butter and golden syrup.


9. Make a little hole in the centre of the flour, coconut and sugar mix. i.e well. Then pour the butter and golden syrup mixture into the dry ingredients.


10. Mix it together well, make sure you can't see any flour. It may be crumbly.

11. Prepare a tray, cover an oven proof tray with baking paper and if you think you need to lightly grease it with some spray oil or butter.


13. Using your hands, take about a spoon full of the mix, roll it into a ball and then squish it down a little on the tray.


14. Cook in the oven for around 20 minutes or until golden brown. 


15. let them sit for 5 to 10 minutes so they cool and set.


NOW ENJOY :)


My mum and I often make a mix of these, shortbread and sugar cookies to give to our family. We usually wrap them up in some cellophane with some ribbon tied around the top and wah lah, a cute home made present for those you love that look great and taste even better. 

Can you believe there are only 28 days until Christmas, that's less than a month! Are you all as excited as I am? Let me know if you love Anzac Biscuits as much as my family and I, if you have tried them before or if you are going to give them a go. Don't forget if you try them out to let me know in the comments or tag me in a photo on Instagram, you can find my social media links under the header, or my common username is Bloggermads. 
Are there any particular things you guys want me to write about?  I'm just curious.
Did I metion there are currently 516 of you on Bloglovin'
I hope you enjoyed and have a wonderful day/night.
TTFN
Mads xx


Friday, 17 July 2015

Dulce de Leche Filling & Other Things

Hey Amazing People,
First... Um there are 270 of you! THAT'S AMAZING!!! Also this weeks most popular Instagram posts are macaroons and puppies are my most popular posts, I just thought I would share that with you. 


Recipe: 
Like I said in my previous post, today I will be sharing with you how to make Duche de Leche Filling, which I used in my macaroon recipe. Let's get started. 


Ingredients and Equipment

  • 1 395g can of Sweetened Condensed Milk
  • Boiled water (amount depends on how large your trays are)
  • Glass dish- oven safe
  • Either a roasting pan or cake tin - large enough for you glass dish to fit in and easily remove
  • Aluminium Foil

Method
1. tie back long hair and wash your hands, Stay sanitary  :)

2. Pour you condensed milk into the glass tray

3. Cover the glass dish in foil

4. Place foil covered tray in cake tin/roasting tray 

5. Fill the rest of the roasting tray with boiling water until it comes to the same height on the glass as the condensed milk.

6. Bake in the oven at 220 degrees Celsius for 1 hour.

7.CAREFULLY remove from the oven and stir, It will 
be super hot and so will the surrounding water.

8.Use as filling or topping or eat. 

                                             
TAH DAH! The Duche de Leche Filling.
Have you made this, a variation or want to have a go? let me know in the comments below.
Are there any particular things you guys want me to write about? I'm just curious.
I hope you enjoyed and have a wonderful day/night.
TTFN
Mads xx


Friday, 10 July 2015

MACAROON RECIPE

Hello,
As you may have noticed, today is Friday and I have decided to share a recipe with you all...
You may have guessed it already, Macaroons. 

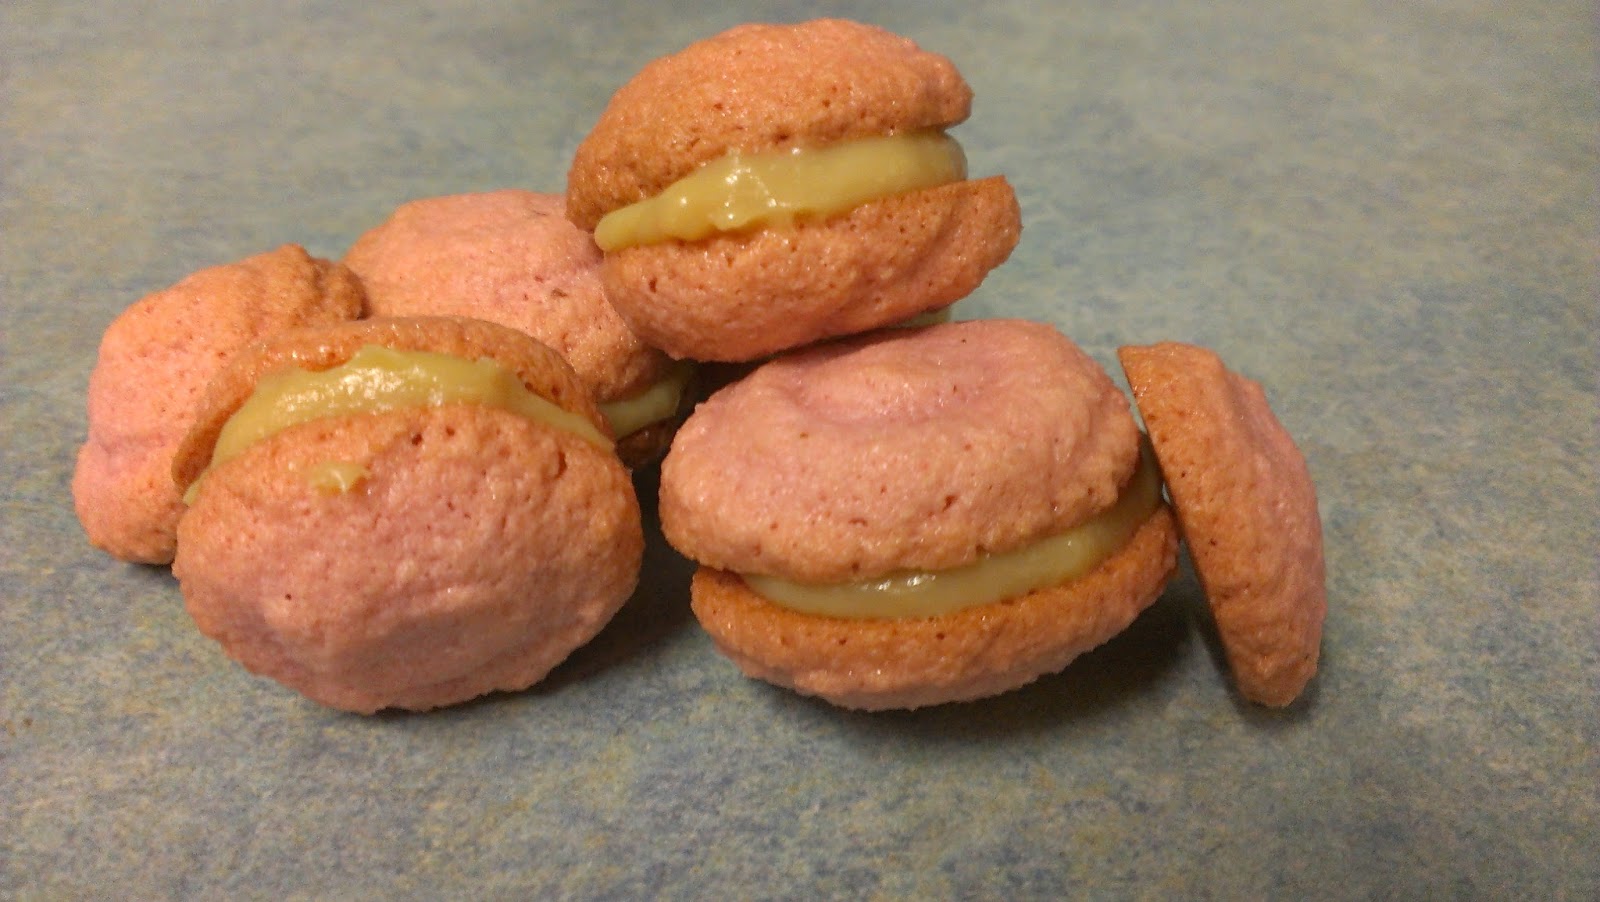
The shells I am making are just plain so you add your own twist to them, but I have decided to put in a caramel filling, specifically Dulce de Leche filling ( I am pretty sure that's what it is called). So lets get started:


INGREDIENTS and EQUIPTMENT- for the macaroon shells


  • 4 Egg Whites
  • 1/4 cup of Castor Sugar
  • Food Colouring of your choice
  • 200g of Almond Meal
  • 1/2 cups of Icing Sugar
  • Pinch of Salt
  • 1/2 tea spoon of Vanilla Essence
  • Large Bowl
  • Sieve
  • Spatula
  • 2 Trays 
  • Baking Paper
  • Electric Mixer
  • Measuring Cups
  • Large Cup

METHOD
  1. Stay sanitary and pull back long hair (I'm sure you daont want to pull it out of your macaroon) and wash your hands!
  2. Pre-Heat oven to 160  degrees Celsius
  3. Separate your eggs, egg whites in a large bowl and yolks in a smaller bowl ( my dog likes them mixed with his biscuits or you could make custard...)

4. Whisk with an electric mixer on high, gradually adding in the castor sugar, until eggs become stiff and can form white peaks. If your game enough try and hold it upside down above your head. At this point mix in your choice of colour to the egg whites- you can use the electric mixure for a few sweconds and it should be done or fold in with a spatula


If you can't tell, that last photo is me holding the egg whites that where turned pink, upside- down without them falling out. I was so proud, they always fall/spill when I try this.


5. Mix your almond meal, icing sugar and salt, the sieve it into your egg whites. Mixcarefully with a spatula.


    6. Prepare trays by placing a sheet of baking paper on them and just to be sure, lightly spray them with some oil.
    7. Fill your piping bag with the mixture. To do this I put the bag in a huge cup and fold the edges over the rim so it looks like this...                                                                      

    It is heaps easier, then just scoop the mixture into the bag, twist the end and if you want these pegs can keep it closed so it doesn't come out the top. Cut the bag about 1cm from the tip.

    8. Pipe onto the trays so they are about 3cm in diameter, make sure you space them out a bit so they have some room to grow if they need.


    9.If There are little peaks on you soon to be shells you can dip your fingers in water then smooth them over.

    10. Let them sit for about an hour before you put them in the oven.
    bake them for 30 minutes and then let them cool completely before you fill them.

    11. Once cool, take a small spoon of filling and put it on one shell, squish another half on top and TAH DAH, A MACAROON!


    Hope you enjoyed it, I think you will find this a little more detailed than my last recipe post. They may not be the prettiest but they taste good :)
    MY next post might be the recipe for the Dulce de Leche filling, it is so simple, OR a list of some great up and coming Aussie bands I have been stumbling upon on YouTube and Instagram.  
    P.S I have 250 followers on Bloglovin' , 45 followers on Instagram and 19 on Pinterest, YAY THANK YOU ALL SO MUCH!
    Also Happy Birthday Ashton.
    Have a lovely day/night
    Mads xx :) 


    Friday, 1 May 2015

    Attempting Marshmallow Bar Things...


    Hi, how are you all?
    Today I had some marshmallows in my cupboard and I was like hmmmm... I saw a fun looking rice bubble bar with this stuff on the internet, and therefore decided I would make some.
    however I didn't really think through it as well as I should have.

    This was the end result.


    This is a very informal and not the most accurate recipe so I warn you if you ever decide to follow, I think I was just lucky. Do feel welcome to learn from my mistakes while making this though.
    Equipment and Ingredients:
    •  marshmallows
    • Rice Bubbles 
    • A Saucepan
    • A medium Bowl
    • A Spatula
    • A tray
    • Baking Paper
    First of all I placed my marshmallows into the saucepan, put that on the stove on medium heat to melt.
    Second I grabbed out my rice bubbles. It turns out I currently dont have any rice bubbles...                So cornflakes and musile it was!

    In a bowl I placed some cornflakes for my first batch ( notice how I also didn't measure anything? yeah, I was winging it and that was a stupid mistake) then checked back on my marshmallows. 

    The marshmallows seriously had done nothing, they were in perfect shape. I stired it a littles and they just bounced around instead of melting. Out of inpatients I turned the heat up and set up my tray.

    To set up my tray I Just sprayed it so the  baking paper would stick and then lined it with the baking paper. Done. or so I thought.

    When I checked the the marshmallow this time they had started to melt and when I mixed it, It looked weird. Lumps, stringy sugar bits, pink and white sticky slime.


     I don't know but it didn't seem melted so I just left it to melt by itself a little longer.

    I came back to a slight sweet toasting smell, which reminded me of camping, so it was okay until I realised it was my precious marshmallows. The bottom wasn't burnt but browned. I decided it was time to pour it into my cornflakes (again not measuring). 

    It is the hardest thing to mix, it just makes a mess and then takes ages to coat everything. Then it goes into a huge clump and sticks to the side of the bowl and the spatula. So frustrating.


    Eventually I put it in the pan but it wasn't very much so it took up about half the space. Trying t spread it was a nightmare, I found using your hands heaps easier, you just have to wet themn a little first otherwise it will stick to your hands too.


    I then sprinkled some sprinkles on top because they are amazing and then put it in the fridge.

    For my second batch I used some musile and chocolate chips, using my great instincts ( not) I just put random amounts in. Then the marshmallow, stirred, put in tray, sprinkles and fridge. What I wasn't expecting was my mixture to go a dark brown weird colour thanks to my chocolate chips because they were meant to be baking chips that hold their shape. Disappointment.

    I had some marshmallow left, so I decided to make some more cornflake ones, these had a much larger marshmallow to cornflake ratio and was harder to work with because the marshmallows where cooling. 

    Too make troubles worse I was reminded that the baking paper didn't work very well and the bars were sticking to it so I took them off and sprayed a new piece of paper then put them back on.

    To finish put them on a chopping board with a knife dusted in icing sugar so they didn't stick and cut the edges off because they weren't the best looking. I even cut out some love hearts with cookie cutters (with great difficulty)  because they were cute. In the end they didn't turn out as bad as I had expected, they are very sweet of course but I suggest you have a go. 

    It turns out I ended up using: A saucepan

    • A spatula
    • A bag of marshmallows
    • An unknown amount of cornflakes
    • An unknown amount of musile 
    • Some chocolate, not so shape holding, chips
    • A chopping board
    • A bowl
    • Sprinkles
    • A cookie cutter'
    • Icing sugar
    • Chopping board and knife.
    • Baking paper
    • Spray oil
    So the moral of the story I guess is to research and maybe make a plan before hand, however they didn't turn out that bad.  


    Hope you enjoyed and if you have ever made these or want to, let me know in the comments below.

    TTFN
    Mads =)